Showing posts with label easter egg. Show all posts

Friday 15 March 2024

Face Cloth Easter Bunnies! Easy and Fun!

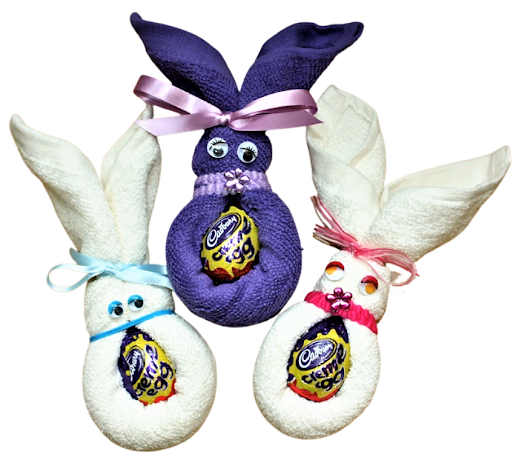
Face-Cloth Easter Bunnies
It's three years since I posted a tutorial on making up these Face Cloth Easter Bunnies! See it Here

We have made some again this year, to raise some funds for our Mencap Arts and Crafts group and instead of using ribbon around the middle bit, we have used elasticated hair bands. 

These cost less than ribbon (we bought a card of 20 for £1) and are very easy to use....And we think they make a pretty belt! 

For the Boy ones we used plain hair bands as you can see in the photo above.
Face-Cloth Easter Bunnies

So have fun making your Easter Bunnies - they make lovely gifts 
and with a face cloth to keep after the Easter Eggs have all been devoured!

Face-Cloth Easter Bunnies

...or like us you can use them to make some funds for your group!

Wednesday 4 March 2015

Easter Basket to Make - A4 Printable Template

Easter basket with eggs and chicks craft to make

This Easter Basket is made of thin card and can easily be printed, as the Template is A4 in size. This is how we made it up...

You will need...

A4 Sheet of thin card

Paints or felt tip pens

2 Split Pins

"Nest filling" - we used toy filling, but you can use cotton wool or shredded tissue paper just as well.

Stickers for the handle (or draw your own pictures)

Mini Easter Eggs

Chicks - we bought ours at our local craft shop.

How to Make it...

Print the Easter Basket Template directly onto your thin sheet of card.

Colour-in the Bunny and Easter lettering.

Cut out the basket and round off the corners.

Cut along the four lines as in the picture.

Cut out the handle.


Fold up the two ends and fold the pieces with the rounded corners over them. 

Slip the end of the handle against the inside, so you now have four layers. 

Make a small hole through these four layers (we used a large darning needle) and hold them together with a split pin (also called a Brad)


Decorate the handle with stickers.

Place your Nest Filling into your basket and arrange your eggs and chicks.


Have fun making your Easter Baskets! And eating all that yummy chocolate...!


Saturday 15 March 2014

Easter Bunting to Celebrate Spring! Tutorials!


We made our Easter Bunting using different shapes as well as the traditional triangular flags. The Easter Eggs you see were made following this great tutorial
Paper Strip Easter Egg  by Merrilee.

We also printed bunny pictures (loads to be found on Google) which were coloured-in and stuck on.

Below, the black flags have been decorated with Easter die cuts (found on eBay) and pom poms.

The chicks we bought ready-made and made them a "nest" with two small paper plates. See here how to do this.


For more Easter ideas click on the Easter button at the top of my Blog - have fun with your groups...