Thursday, 28 November 2024

Four New Free Christmas Printables!

Free Christmas Printables - List for Santa - Placemats - Nativity colouring in
Have been having fun putting together some new Christmas Printables...!

Here is the first one - a List for Santa!

Good one for parents, to at least have an idea, what the kids are hoping Santa will bring them on Christmas Day!

Then we have a beautiful scene to colour in - The Nativity

As our schools prepare and show their Christmas Nativity Plays, this will give the kids the traditional and everlasting scene to colour in and display as we celebrate  the Festive Season...

Free Christmas Printables - List for Santa - Placemats - Nativity colouring in
Lastly we have two new placemats, to colour in and prepare to use them on your Christmas Day table, with your family and friends...

OR - why not set the children's places with a Christmas Placemat ready with crayons and let them colour them in, while waiting for the food to be served! 
And again while waiting for Christmas pudding to arrive! Peace guaranteed!!

Christmas Placemat 1

Christmas Placemat 2

For lots more Christmas Placemats and other Christmas Crafts Click here ...

Happy Christmas crafting!

Free Christmas Printables - List for Santa - Placemats - Nativity colouring inFree Christmas Printables - List for Santa - Placemats - Nativity colouring in

Christmas Angel - Paper Plate Craft!

Paper plate craft Christmas Angel
As the Festive Season approaches, we having been busy at The Day Centre for the Elderly making Christmas decorations and cards. Our favourite this year seems to be "The Christmas Angel" made from a paper plate!

Easy to do, but quite lovely when she is painted and "sparkled up" with tinsel around her skirt...

If you would like to make your own Christmas angel, I am happy to share it with you.

You Will Need

Paper Plate (I used a 23cm diameter plate)

Pencil Carbon Paper

Glue

Sprinkle Glitter

Paints or other "Colouring-In" materials

Tinsel or any other trimming you choose.

Stapler

Sequins or flat beads (if you want - to stick onto front of dress)

Turn the paper plate over so your are working on the underneath surface.

Trace the Angel Template 

onto the paper plate - on underneath surface!

Apply glue to the wings and sprinkle with glitter.

Paint the dress (or colour-in with your felt tip pens etc.)

Paint the hair and face.

Leave until dry.


Cut away the unpainted area.

Cut along the outside of each wing leaving only the last 3cm attached.


Bend the cut edges of the plate backwards and staple together as in picture.


Attach your tinsel or other trimming around the bottom edge of the skirt, using a stapler.

Stick on your sequins or beads onto the front of the dress. 

Happy Christmas!

Paper plate craft Christmas Angel
                                      

Make a 3D Card Christmas Tree - with Printable Template!


This 3D Christmas Tree can be made quickly and easily! I used green card and foil stars, but you can use any colour card and decorate your trees with whatever you can find!

You will need...

Card
Scissors
Decorations

How to make it...

Print out your template - Click here for Christmas Tree Template


Cut out two Christmas Trees from your card.

Cut one tree, from the bottom edge, along the centre line, to small horizontal line that I have drawn on the template.

Cut the other tree from the top tip down to the same small horizontal line.


Slot the two trees together!

Actually you will now need to decorate them and it is easier to do this on the two separate trees - on both sides.

When they are decorated, slot them back together again and your tree is ready - have fun making them with your group!

Friday, 15 March 2024

Face Cloth Easter Bunnies! Easy and Fun!

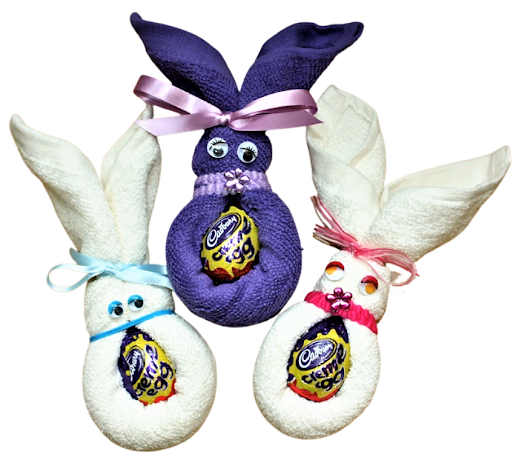
Face-Cloth Easter Bunnies
It's three years since I posted a tutorial on making up these Face Cloth Easter Bunnies! See it Here

We have made some again this year, to raise some funds for our Mencap Arts and Crafts group and instead of using ribbon around the middle bit, we have used elasticated hair bands. 

These cost less than ribbon (we bought a card of 20 for £1) and are very easy to use....And we think they make a pretty belt! 

For the Boy ones we used plain hair bands as you can see in the photo above.
Face-Cloth Easter Bunnies

So have fun making your Easter Bunnies - they make lovely gifts 
and with a face cloth to keep after the Easter Eggs have all been devoured!

Face-Cloth Easter Bunnies

...or like us you can use them to make some funds for your group!

Sunday, 30 July 2023

An Easy Game of Dice...!

Our Version of PIG
(not sure why it is called that!)

An Easy Game of Dice - Best with 2,
but can be played with up to four players.

You will need... 2 Dice, Paper and pen for scoring.

Goal... Be the first player to reach 100 points.

How to Play... Each player in turn throws the two dice together. He has three throws. He adds his points together as he goes.
If a 1 is rolled, that player's turn ends and no points are earned. If after one or two throws he decides to "hold" (rather than risk a 1 on his next throw and losing all his points) he keeps his score and passes the dice onto the next player.

Scoring Examples...

Example 1: Peter rolls a 3 and a 4 and decides to continue. He then rolls a 6 and a 1. Because he rolled a 1, Peter's turn ends and he earns 0 points.

Example 2: Jack rolls a 6 and a 2 and decides to continue. He then rolls a 6 and a 5 and decides to "hold". Jack scores 19 points.


Example 3: Mike rolls a 2 and a 3 and decides to continue. He then rolls a 4 and a 2 and carries on to his third throw of a 4 and a 3. He scores 18 points.

NOTE: If a double is thrown then the player doubles that amount. Eg a double 4 will be 8 x 2 = 16 points, a double 6 will be 12 x 2 = 24 points.

If a double 1 is thrown then the player gets 25 points for that throw. Only a single 1 will end the players turn.

When a player reaches a total of 100 or more points, the game ends and that player is the winner...!

Tuesday, 11 April 2023

Two NEW Printable General Knowledge Quizzes for your Groups

Wanting an easy General Knowledge Quiz?

Here are two for you...

Each has 10 questions and I have given you the answers, on a separate page.

They can be printed as required...


General Knowledge Quiz (2)

Looking for more printable quizzes - all with answers on a separate page?

Then do look at my eBook of 41 x 10 Printable Quizzes

Lots of different subjects and all picked, especially for the older generation...

Enjoy!


Sunday, 2 April 2023

Easy Easter Egg Wreath to make - Printable Template

An Easter Wreath made from Card Easter Eggs

We made an Easy Easter Egg Wreath today!

It was a group effort, as each egg was designed individually and then put together to form an Easter Wreath!

If you would like to make your Easter Egg Wreath then here is how...

You will need...

Two A4 sheets of thin card

Embellishments - we used Washi Tape, Stickers and Crayons 

Glue Stick

Ribbon
An Easter Wreath made from Card Easter Eggs
How to make...

Print the Easter eggs directly onto the thin card - here is the template

 Easter Eggs x 4 Template

Cut out the eight Easter Eggs and then have fun decorating them - use what embellishments you have, or paint / colour them in with your crayons

When they have been decorated arrange them in a circle, overlapping each Easter Egg with the next one, as in the photo above

Pray for Ukraine
Using your glue stick, attach the Easter Eggs to each other 

We used a Bunny sticker to attach our ribbon

Hope you enjoy making your Easy Easter Egg Wreath!

An Easter Wreath made from Card Easter Eggs


Thursday, 30 March 2023

Paper Plate Easter Basket to make - Tutorial


Paper Plate Easter Basket


Perfect for little hands - a Paper Plate Easter Basket to fill with Easter Eggs and other treats!

You will need...

Two paper plates (ours were basically yellow but any will do)

Double sided adhesive tape or glue

Embellishments - we used Washi tape and Easter themed foam cut-outs - all from our local 'The Works' shop 

OR paint or colour-in the basket if preferred 

Narrow ribbon (optional)

How to make...

Cut one paper plate in half

Cut out a portion of the other plate as per photo below...


If you are going to paint or colour-in your Easter basket then do so before sticking them together. 

Remember the bottom side of the plate will be the outside of the Easter Basket!

Glue the two plates together top sides facing as per photo below...


Using your embellishments, decorate your Easter Basket - tying the ribbon streamers to the handle to finish it off!

Hope you all have fun with this Easter craft!