Showing posts with label buttons. Show all posts

Sunday, 16 October 2022

Halloween Buttons!


Halloween Button Craft

A very easy Halloween Button craft to do with your groups...

What you need...

A4 sheet of card for background 

Yellow or orange card for your pumpkin 

Black buttons for your spiders and orange etc for the pumpkin

Glue stick 

Black felt tip pen 

How to make...

Print out your pumpkin - here is the Pumpkin Template 

With thanks to One Little Project for this free template!

Print your Halloween word - Halloween Template

Cut out both of these templates and stick them onto your A4 card

Stick your coloured buttons onto the pumpkin and scatter and stick the black buttons around the card

Draw on the spider legs...

Have a Happy and Scary Halloween...!! 

Halloween Button Craft

Tuesday, 25 January 2022

Valentine Padded Felt Hearts - Tutorial and Printable Templates


Padded Valentine Hearts tutorial
 Sewing Valentine Padded Felt hearts on a cold Winter's afternoon, with a cup of tea and donuts to follow - our Mencap group really enjoyed this project!

What you will need...

One A4 size piece of felt - for the 2 large heart shapes

Smaller pieces of felt in contrasting colours for small hearts

Buttons

Embroidery thread and needle

Ribbon (30cms or longer if you wish)

Polyester fibre filling (toy stuffing)

Pinking shears (optional)

How to make it...

Print out your patterns  

3 x Heart Template Shapes

Cut out two large hearts 

Cut out one each of the smaller size hearts (per side **)

Place the button on top of the two smaller heart shapes and sew them 
together, leaving your thread hanging down underneath.

Place this in the centre of one of the large hearts and sew together, through the three hearts and the button.

If you want - do the same with the other large heart (you will then have small hearts and buttons on both sides of your finished padded heart **) 

Place the two large heart shapes together and starting at the bottom point, stitch them together - either using blanket stitch or a simple running stitch.

When you reach centre top of your heart, slip the ends of your folded ribbon in between the two large hearts and sew through them to attach the ribbon to the heart.

Continue sewing down the other side, stopping when you have about 4cms still open. 

Don't end off - leave your thread hanging.

Stuff your heart at this point and then continue sewing until you reach the bottom point again.

If you have used a running stitch (as in the purple sample), you can trim off the edges of your heart with pinking shears (optional) 

Here are some our group made... Hope you all enjoy this 
project!


Felt Hearts Valentines


Click on these hearts for another Tutorial >>>>>>

Thursday, 1 September 2016

A Simple Little Felt Purse - Tutorial

Here is a very simple little felt purse - we will be making these at Mencap when we start the new term in September - so more photos to follow when we see what they come up with - always delights me to see their ideas and creations!

What you will need...

Felt

Embroidery thread

Charm (optional) Can use buttons or anything else as an embellishment

Magnetic clasps (we got ours on eBay)

How to make...

Cut out  your two pattern pieces and your heart (or any other shape such as a flower or something geometrical)

Felt Purse Pattern

Attach you magnetic clasps positioned as below (instructions will be with clasps)


 Stitch your charm or button to your heart shape.

Sew your heart over the back of the magnetic clasp, on the outside of the flap as below, using blanket stitch.

Join the two purse pattern pieces - again, I used blanket stitch.

 Easy to make and useful for coins, lipstick or a spare tissue!


Here is Jenna with her felt heart purse - and wearing such a pretty floral dress - Jenna is such a pleasure to sit and do craft with - always has a big smile for everyone and tackles everything with such enthusiasm...!


Sunday, 19 June 2016

Felt Bunnies Wall Hanging - Tutorial and Templates


Bunn felt wall hanging tutorial
 A simple little felt wall hanging - here is how to make it...

You will need...

A4 sheet of felt for background

Scraps of felt for bunnies and flowers

Buttons

Pom pom or cotton wool balls for tails 

Double-sided sticky pads to attach tails 

Embroidery thread

Wooden dowel and ribbon to hang

 How to make...

Print out the Bunnies and Flower templates 

(my flowers were cut from a die on my Big Shot, but if you want to cut by hand here is a flower template to use)

Bunnies Template

Flower Template

Take your A4 sheet of felt and turn over a hem of 2cm (width of hem depends on the thickness of your wooden dowel - we used green garden stakes trimmed to size)

Stitch acro
ss leaving ends open - either on machine or by hand

Cut out your bunnies and flowers

Stitch the bunnies onto the background, using a running stitch

Using double-sided sticky pads, stick on the bunny tails

First stitch both layers of flowers, together with the button and then stitch onto the  background felt

Stitch stems with embroidery thread

Slip the wooden dowel through the hem and tie on a ribbon for hanging


 Here are some we made at Mencap - enjoy making yours!

Friday, 4 March 2016

Felt Hand Puppets - Free Printable Patterns...!

What a lot of fun these were to make - Felt Hand Puppets!

What you will need...

Felt in A4 sheets for the main body pieces

Scraps of felt for belly patches etc

Self-adhesive felt for small patches (optional - can be sewn on instead)

Buttons

Embroidery thread and needle

Ribbon for bows for bears

How to make...

Print out your patterns - here they are...

Hand Puppets Patterns

Before you start cutting out your felt, check hand size against the pattern - adjust the pattern width if necessary. Rather a little big, than too small!

Cut out two main body pieces

Cut out the appropriate patches.

Work on one of your main body pieces - We sewed the belly / snout patches on, using a running stitch, and then using self-adhesive felt, we stuck on the smaller patches. All can be either sewn or stuck on - up to you!

Buttons were stitched on for the eyes / noses and the bears each got a ribbon bow!

The monsters can be created as you will - every one is different!
When you are happy with your Hand Puppet, then stitch the two main body pieces together, close to the edges - easy to do on a sewing machine, but can be hand stitched if you like.


Use your imagination - be creative and then have hours of fun with your hand puppets....!


Saturday, 6 February 2016

Tutorial for Felt Butterfly & Flowers Wall Hanging - Printable Templates

Felt Butterfly and Flowers Wall Hanging
We made Butterfly & Flower Wall Hangings this week at Mencap...


If you would like to make them with your family or with your group - they really do appeal to girls of all ages...!    Here is the Tutorial with Printable Templates.

What you will need...

Felt - A4 sheet for the background

Self-adhesive felt to decorate the butterfly - or use glue...

Felt scraps for Butterfly, Flowers and Hearts

Buttons

Embroidery thread

Thin dowel (we used green garden canes cut to size) 

Ribbon or cord to hang


How to make...

Turn over a narrow hem, just wide enough to slip your dowel into, and stitch - either by hand or on your machine, as I did.

Cut out your butterfly and flowers / hearts (mine are die cut, but you can use this flower and heart template)


Stitch your butterfly onto your background with a running stitch.

Cut the butterfly body out and stitch or stick it on top.

Decorate the butterfly with pieces of contrasting felt - use self-adhesive felt or use glue to attach.

Attach your flowers / hearts - we used buttons to secure them to the background.

Slip the dowel into the hemmed top and tie on your ribbon or cord.


Hope you all enjoyed making your Butterfly Wall Hangings!

Friday, 4 December 2015

Christmas Bunting - Printable Templates!

Felt Christmas Bunting

A simple string of Christmas Bunting - can be made out of felt, as above, but will also be just as effective cut out of card. Mine has just five shapes, but you can make the String of Christmas bunting as long as you wish, using a mixture of the shapes or just choose one or two of them...

You will need...
Felt sheets or Card

Buttons and other embellishments

Tacky Glue

String, ribbon or tape and small craft pegs 


To make...

Print your Template of Christmas Shapes

Cut out the shapes - in felt or card

Decorate with embellishments / buttons, using fabric or tacky glue and leave to dry

Peg the shapes onto your string and hang them up...

Enjoy this exciting time of the year - have fun preparing for the Festive Season...!!

Friday, 16 October 2015

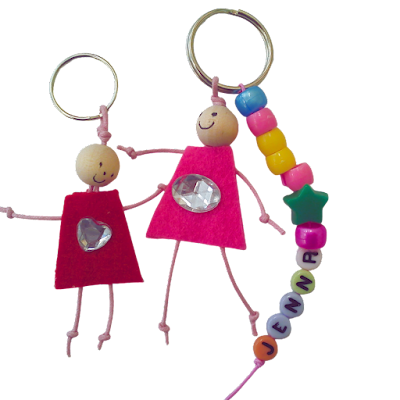
Beady Head Keyrings - Tutorial Wooden Bead & Felt Dolls

Beady Head Keyrings - Tutorial Wooden Bead & Felt Dolls

You just must love these little Beady Head Keyrings!


We made them at Mencap this week and even two little boy Beady Heads appeared..
Beady Head Keyrings - Tutorial Wooden Bead & Felt Dolls
We discovered how to make these little fellows by following 
this very good Tutorial...


We used self adhesive felt for the clothes and stuck the buttons and bling on with double side adhesive tape. 


We added a keyring and some of the class made a string of beads to hang alongside.

Have fun making your own Beady Heads!
Beady Head Keyrings - Tutorial Wooden Bead & Felt Dolls

Friday, 27 June 2014

Make Fun Summer Hats Collage - Tutorial!

Fun Summer Hats Collage!

This week we decided to celebrate Summer (at last!) by making some Fun Summer Hats Collages. 

Easy for any age or ability and some striking results - quite the thing for Ascot we believe!!

What you will need...

A4 sheets white printer paper

Decorative paper / thin card for hat

Embellishments - cutouts of flowers, butterflies,  buttons, ribbons, bows - these can also be the kind you stick on gift parcels - glitter and anything else you have on hand...

Glue sticks (any glue really, but the sticks are less messy and dry quickly)

Double sided adhesive pads to attach bows etc

A4 sheet of card to glue the finished hat onto

How to make it...

Print out the Hat Template

Turn your print over and draw the same shape on the other side of your paper.
 

Easy way to do this is, is to hold it against a window so you can see see through the paper...

Now work on this side (your drawn hat outline) 


Cut strips/shapes (whatever you want) of decorative paper/thin card and glue them across the hat shape - overlap each piece and go over the edges of the hat shape line.


When this has dried, turn your paper over and cut out your hat from the shape on the back of your sheet.


Now the fun part ...Add your embellishments...Buttons, bows, flowers, ribbons, glitter etc


Here are some Flower Templates you can use 

When you are happy with your hat, stick it onto an A4 sheet of card, at a jaunty angle and stick something in the corner to finish it off!


And here are some of our hats we made at Mencap...


 Have fun with your group as we celebrate Summer!


Friday, 17 January 2014

Butterflies and Flowers Collage in a Vase!


 Following on from making our Collage Calendar, our group made collages of vases of flowers, mounted onto black card. Some were made into calendars by adding a calendar tab and others were just a bright picture to hang on the wall!

Here are some samples of their  creations...


Even the least artistic member of the group will end up with a very pleasing picture - on A4 piece of card - cutting, sticking and enhancing with stickers, buttons, ribbon bows etc 

Have a go with your groups!