Showing posts with label kids craft. Show all posts

Friday, 15 March 2024

Face Cloth Easter Bunnies! Easy and Fun!

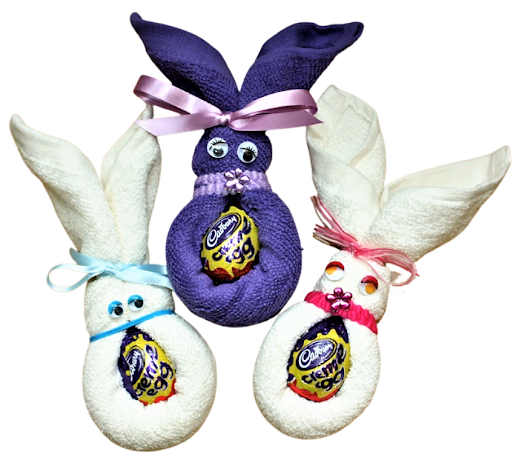
Face-Cloth Easter Bunnies
It's three years since I posted a tutorial on making up these Face Cloth Easter Bunnies! See it Here

We have made some again this year, to raise some funds for our Mencap Arts and Crafts group and instead of using ribbon around the middle bit, we have used elasticated hair bands. 

These cost less than ribbon (we bought a card of 20 for £1) and are very easy to use....And we think they make a pretty belt! 

For the Boy ones we used plain hair bands as you can see in the photo above.
Face-Cloth Easter Bunnies

So have fun making your Easter Bunnies - they make lovely gifts 
and with a face cloth to keep after the Easter Eggs have all been devoured!

Face-Cloth Easter Bunnies

...or like us you can use them to make some funds for your group!

Sunday, 12 March 2023

Birthday and Other Greeting Cards with Tags!

Birthday Cards with tag inserts

 How about making some Greeting Cards with Tags? They are very easy and can be made from a variety of materials...


 We made them at Mencap and they loved the idea of putting a message or greeting on the Tag - a surprise for the lucky recipient when the tag is pulled out...!


 For tags we used a variety of purchased coloured tags, as well common brown luggage labels.

As you can see the "Tag Pockets" were cut out of printed paper and attached to the cards with glue on only three sides.


Ribbons and stickers completed these pretty, fun cards!

Thursday, 26 January 2023

How to Make Felt Valentine Hearts - Tutorial & Templates

Valentine's Day on 14th February - time to make Felt Valentine Hearts!

They can be hung on a door handle or placed in a wardrobe....for a delightful waft of lavender amongst your clothes...! 

What a lovely Valentine gift for you to make! 
Here is the tutorial - with printable heart templates...

You will need... ðŸ’—💗💗

Felt (you will need approx 2 x A4 sizes of main colour and scraps of contrasting colour)

Embroidery thread

Button

Ribbon or cord to make hanging loop

Stuffing - we used Polyester Fibre Toy Stuffing

Lavender Oil (or any perfumed oil) Optional

To Make... ðŸ’—💗💗

Print out the template... Here are the Heart Templates

Cut out two of the large hearts and one each of the smaller hearts.

Attach the two small hearts with a button on top, onto one large felt heart.

Attach your looped ribbon to the top of the other large felt heart.

Stitch the two large hearts together - use either blanket stitch or just a running loop stitch, leaving a gap to insert your stuffing (with, if desired, a few drops of perfumed oil)

Stitch up the gap and you're done! 💗💗💗

These felt hearts are easy to make and are not only for Valentines Day - 
they really are Anytime Hearts!

Saturday, 13 August 2022

Paper Plate Dream Catcher Tutorial - Easy and fun to make!

These Paper Plate Dream Catchers are great fun to make and easy for any age and ability...

You will need... 

A good quality paper plate -  needs to be rigid enough to keep its shape

A length of Yarn - we Used Cotton Yarn DK - 2.5m plus 2 or 3 pieces for the dangles - each about 40cms long - Also about 30cms to make a tag to hang it.

Beads with large holes - we used Pony Beads

Feathers - dyed ones available at craft shops

Colouring-in pens or paints

Punch to make holes 

Sticky Tape

How to make... 

Cut out the centre of the plate.

Punch holes around the inside hole as per photo - about 2.5cm apart - no need to measure - don't have to accurate!

Working on the "bottom" surface of the plate - colour or paint the decoration - our plates had ridges which added to the effect!

Take your long piece of yarn and secure one end with sticky tape to the inside of the plate.

Thread the yarn through the holes - back and forth - no fixed pattern - just as you like! When about two thirds through, thread some beads onto the yarn (see photo above) 

When all the holes are used up, secure the end again with sticky tape, on the inside of the plate.

Punch a hole centre top and make a loop to hang up your Dream Catcher.

Punch two or three holes along bottom edge for dangles...

Tie a bead about a third of the way down on your yarn - then thread beads onto the longer piece above the tied bead.

Thread the end of this yarn, above the beads, through the punched hole and secure with sticky tape inside the plate.

Repeat with other one or two dangles.

Tie feathers onto the ends of yarn below the beads.

Sweet Dreams!
Nicola with her Dream Catcher

Andy painted his Dream Catcher with Acrylics


Tuesday, 2 August 2022

Harry Potter Pop-Ups - Tutorials


Harry Potter Pop up Tutorial

 After a visit to London's "Harry Potter's World" our Craft Group at Mencap were keen to colour-in some Harry Potter characters - loads to find online and printable.

So we decided to use them to create some more Pop-Up pages...

See our previous Pop-Ups - Frozen & Monsters

For an excellent tutorial on how to make Pop-Ups have a look here...


Extreme Paper Making - Pop-up Basics

Here are some more we made...


 So easy to do and who doesn't love Po-Ups! 

Have a go - instead of just sticking pictures into your scrapbooks - make them

 POP-UP!

Thursday, 21 April 2022

New Pattern Designs to Complete...! Printable Templates!

This is a Circle in a Square Collage craft project which I posted in 2016 - I am repeating it with three new variations to play with - starting as always with the basic shapes design, as before and then use your imagination...

Circle in square collage
Circle in Square Designs

Here is the Circle in Square Template

New Pattern Designs to complete
One of the New Pattern Design Templates


Allow each member in your craft group to design and colour their own creation, as they want.

You will be amazed at what is produced...the above were done by our Mencap Art and Craft group and they loved creating their designs...

New Pattern Designs to complete
Very simple, but challenging enough to create enthusiasm and such pride in their artwork...

To make a collage, just cut out the finished squares and stick them together onto card - we used A2 black card, but any colour will do.

Make your collage as big or small as you like - depends on the size of your group of course and how many squares you have to display!

Have fun being creative...!

New Pattern Designs to complete

Saturday, 17 September 2016

An Autumn Wall Mural at Mencap

Autumn Mural

 We put together an Autumn Wall Mural at Mencap this week - with temperatures in Essex topping 30C it still felt like Summer, but now a few days later and after some very welcome, steady rainfall, we are back to normal weather - Autumn - "a season of mists and mellow fruitfulness"


 Our centre piece (Autumn Wreath) was made using an excellent tutorial from this website In the New House 

We added the wording in the centre wreath.


 Stacy insisted on the Pink Tail - as was a girl squirrel...! And why not?? Even squirrels can have fashion tints!


Sunday, 19 June 2016

Felt Bunnies Wall Hanging - Tutorial and Templates


Bunn felt wall hanging tutorial
 A simple little felt wall hanging - here is how to make it...

You will need...

A4 sheet of felt for background

Scraps of felt for bunnies and flowers

Buttons

Pom pom or cotton wool balls for tails 

Double-sided sticky pads to attach tails 

Embroidery thread

Wooden dowel and ribbon to hang

 How to make...

Print out the Bunnies and Flower templates 

(my flowers were cut from a die on my Big Shot, but if you want to cut by hand here is a flower template to use)

Bunnies Template

Flower Template

Take your A4 sheet of felt and turn over a hem of 2cm (width of hem depends on the thickness of your wooden dowel - we used green garden stakes trimmed to size)

Stitch acro
ss leaving ends open - either on machine or by hand

Cut out your bunnies and flowers

Stitch the bunnies onto the background, using a running stitch

Using double-sided sticky pads, stick on the bunny tails

First stitch both layers of flowers, together with the button and then stitch onto the  background felt

Stitch stems with embroidery thread

Slip the wooden dowel through the hem and tie on a ribbon for hanging


 Here are some we made at Mencap - enjoy making yours!

Tuesday, 9 February 2016

Valentine Wall Mural...! Hearts and Glitter!

Valentine wall mural hearts

We had great fun putting this Valentine Wall Mural together...
at Mencap Art and Craft group in Braintree!

As the Beatles say "All You Need is Love"...!

Happy Valentines Day!

Saturday, 6 February 2016

Tutorial for Felt Butterfly & Flowers Wall Hanging - Printable Templates

Felt Butterfly and Flowers Wall Hanging
We made Butterfly & Flower Wall Hangings this week at Mencap...


If you would like to make them with your family or with your group - they really do appeal to girls of all ages...!    Here is the Tutorial with Printable Templates.

What you will need...

Felt - A4 sheet for the background

Self-adhesive felt to decorate the butterfly - or use glue...

Felt scraps for Butterfly, Flowers and Hearts

Buttons

Embroidery thread

Thin dowel (we used green garden canes cut to size) 

Ribbon or cord to hang


How to make...

Turn over a narrow hem, just wide enough to slip your dowel into, and stitch - either by hand or on your machine, as I did.

Cut out your butterfly and flowers / hearts (mine are die cut, but you can use this flower and heart template)


Stitch your butterfly onto your background with a running stitch.

Cut the butterfly body out and stitch or stick it on top.

Decorate the butterfly with pieces of contrasting felt - use self-adhesive felt or use glue to attach.

Attach your flowers / hearts - we used buttons to secure them to the background.

Slip the dowel into the hemmed top and tie on your ribbon or cord.


Hope you all enjoyed making your Butterfly Wall Hangings!

Wednesday, 13 January 2016

Two eBooks - 41 Easy Quizzes & Simple Craft and Activities...


Quiz eBook

I have put together two eBooks to help you with your groups...
41 Easy Quizzes and Answers and Simple Crafts and Activities...
read on for more details on how to get yours...

Simple Crafts eBook

My eBook Simple Crafts and Activities is now available to buy for a nominal fee of £2.75 (Paypal only please) and then can be downloaded instantly in a PDF file format - ready to print either in total or only the pages you need for a project...

This eBook will save you hours of searching for crafts and activities - suitable for the older folk, but also many craft projects for any age...

All my tutorials have printable templates to make it easy for you...

So click here and have a look...Simple Crafts and Activities

Simple Crafts eBook

41 easy Quizzes with Answers is available if you are looking for quizzes - especially set for the older generation... Also only £2.75 and printable PDF file download.

Quiz eBook

Friday, 8 January 2016

Cat Collage A4 Calendars - Tutorial!

Cat Collage Paper


We made Cat Collage A4 Calendars at Mencap this week...

What better way to start a new term in the New Year?

The choice of schemes is endless but we decided on Cats!

Enjoy making yours with your group...
What you will need...

A4 Card - we used Black Card

Strips of coloured paper - plain and/or designed

Cat pictures - cut from a book found in a charity shop

(gathered from free colouring pages)

Glue stick

Punch and string for hanging

Calendar tabs - we found ours on eBay

Doubled-sided adhesive tape

How to make...

Glue your strips of coloured paper onto the card - leave some black showing through if you like

Colour in you cats and stick them and other cut-out cats on top of your strips of coloured paper

Using double sided tape or glue - stick on the calendar tab

Punch two holes at the centre top and thread a piece of string/cord through for hanging.


Saturday, 21 November 2015

Three New Christmas Placemats - Print and Colour-in..!

Christmas Placemat
Keep everyone busy, in the run up to the Festive Season - Three new printable Christmas Placemats, for you and your groups and families to colour-in, ready for your Christmas Dinner table...

Here is the link ...   Three Christmas Placemats

Also - why not make this little felt Christmas stocking - fill it with candy and hang it on your tree...!


Tutorial - Felt Christmas Stocking Decoration


Friday, 20 November 2015

Easy 3D Tissue Flowers in a Vase - Tutorial and template

3D tissue flowers in vase

So easy to make these 3D Tissue Flowers - we put them in a vase and mounted them onto black card...! 

These tissue flowers can also be made to decorate greeting cards - just make them smaller to fit your card.

What you will need...

Tissue paper

Stems - we used wooden coffee stick-stirrers but you can use string, paper strips etc

Print-out of template for vase

A4 sheet black card

Strip coloured paper for "table cloth"

Double sided sticky pads

Glue stick

Stapler

Stickers and bows (optional)

How to make them...

Cut out one vase template (there are two on each print-out) crease down lines on sides and bottom.


Turn it over and colour-in your vase front.


Then on the coloured side - Apply glue to the tabs - bottom and sides..


Attach the bottom tab to your black card and then ...


folding your glued tabs inwards, attach you vase to the black card. Push the tabs inwards so the vase is 3D and not flat.


Fold your tissue paper so you have about 20 layers of tissue (approx 9cms square) and staple twice in centre as per picture below.


Cut into a circle (no need to measure - doesn't matter if a bit wobbly!) and then cut into edges about 1cm (as below)


Then, one layer at a time, separate the tissue layers and pinch up into the centre.


Place your stems in the vase (fix in place with a piece of double-sided adhesive pad) and then attach your flowers - also using double-sided adhesive pads.

Finish with a strip of coloured paper across the bottom "table cloth" and we added a few butterfly stickers...


These 3D Tissue Flowers can also be used on greeting cards - make them any size you want...!