Showing posts with label bunnies. Show all posts

Friday, 15 March 2024

Face Cloth Easter Bunnies! Easy and Fun!

Face-Cloth Easter Bunnies
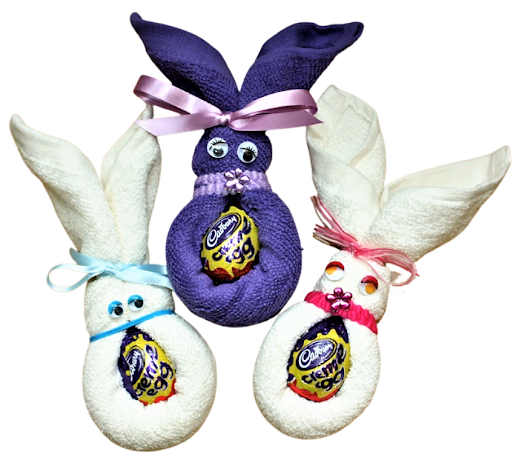
It's three years since I posted a tutorial on making up these Face Cloth Easter Bunnies! See it Here

We have made some again this year, to raise some funds for our Mencap Arts and Crafts group and instead of using ribbon around the middle bit, we have used elasticated hair bands. 

These cost less than ribbon (we bought a card of 20 for £1) and are very easy to use....And we think they make a pretty belt! 

For the Boy ones we used plain hair bands as you can see in the photo above.
Face-Cloth Easter Bunnies

So have fun making your Easter Bunnies - they make lovely gifts 
and with a face cloth to keep after the Easter Eggs have all been devoured!

Face-Cloth Easter Bunnies

...or like us you can use them to make some funds for your group!

Monday, 27 February 2017

Easter Face-Cloth Bunny and Hand-Towel Teddy to make!


Easter Face-cloth Bunny and Hand Towel Teddy Tutorial

Easter is coming around again soon, and so why not make a few gifts - easily made by just folding towelling...

Using a face-cloth for the Bunny and a hand-towel for the Teddy,  they will both be useful gifts, after the little choccy eggs have been  devoured...!

I have made the face-cloth Easter Bunny before...

for tutorial see here and here

I decided to make him again this year, as we now have a hand-towel Teddy to add to the fun...

The Easter Bunny has button eyes this time, but you can us googly eyes of course!

The hand-towel Teddy is easy to make and all you will need is a hand-towel, elastic bands, ribbon and buttons or googly eyes.

Here is an excellent tutorial showing how to make it - just folding....
No sewing involved!

Hand-Towel Teddy

Have fun with your groups or families, making these Easter Gifts...

Easter Face-cloth Bunny and Hand Towel Teddy Tutorial


Sunday, 19 June 2016

Felt Bunnies Wall Hanging - Tutorial and Templates


Bunn felt wall hanging tutorial
 A simple little felt wall hanging - here is how to make it...

You will need...

A4 sheet of felt for background

Scraps of felt for bunnies and flowers

Buttons

Pom pom or cotton wool balls for tails 

Double-sided sticky pads to attach tails 

Embroidery thread

Wooden dowel and ribbon to hang

 How to make...

Print out the Bunnies and Flower templates 

(my flowers were cut from a die on my Big Shot, but if you want to cut by hand here is a flower template to use)

Bunnies Template

Flower Template

Take your A4 sheet of felt and turn over a hem of 2cm (width of hem depends on the thickness of your wooden dowel - we used green garden stakes trimmed to size)

Stitch acro
ss leaving ends open - either on machine or by hand

Cut out your bunnies and flowers

Stitch the bunnies onto the background, using a running stitch

Using double-sided sticky pads, stick on the bunny tails

First stitch both layers of flowers, together with the button and then stitch onto the  background felt

Stitch stems with embroidery thread

Slip the wooden dowel through the hem and tie on a ribbon for hanging


 Here are some we made at Mencap - enjoy making yours!

Sunday, 27 September 2015

Mod Podge on Hardback Notebooks - Decorating the cover!


This week, at Mencap, we decided to try our hand at using Mod Podge...!

What you will need...

Deciding that working on a flat surface was the best choice for a first attempt, we bought some A5 Hardback Notebooks.

A Bottle of Mod Podge Gloss 

Some Sponge "Brushes"Image result for sponge brush

We decided to use some fairy and woodland cutouts we had and some craft paper that we use for backing paper, on greeting cards. 

(Mod Podge works best on fairly thick paper we found - sheets of thin paper wrinkled a lot - sometimes this is a desired effect, but not for our project)  

How to do it...

We found Mod Podge Rocks a very useful site, with loads of tutorials - here is the link...explains how to use Mod Podge far better than I can!

 Learn How to Use Mod Podge

So enjoy using this wonderful product - don't worry if it looks white and patchy when you finish your work - by the next day it will have dried clear and bright - very rewarding!